Samsung AtivBook 8 Touchpad Reverse Scroll Setting

I was having an annoying problem with my Samsung AtivBook8’s touchpad.  The touch pad’s control panel applet was not saving the “two finger scroll – reverse” setting.

AtivBook8ScrollReverse

Unchecking the reverse option did appear to work initially – the page scroll direction does indeed go back to normal – however on restarting the machine the setting always reverted back to being enabled.

This was driving me mad!  Fortunately it can be fixed:

1) Uncheck the “reverse” option for two finger scrolling in the control panel applet.  Close the applet.

2)  Using RegEdit change the following changes to the registry:

HKCU\Software\Elantech\GroupOption\SmartPad\SC_Reverse_Enable = 0
HMCU\Software\Elantech\SmartPad\SC_Reverse_Enable = 0

Making these changes turns off reverse scrolling for good.  At least it worked for me.

Debugging WP7 Deep Links on Live Tiles

Windows Phone 7.1 now includes the ability to pin Secondary Tiles to the user’s start screen. There are many tutorials out there on the net that describe how to implement them, but basically you provide the OS with the URI of the xaml page to load when the user taps on the tile.

The problem is how do you debug this?  When you F5 top start debugging in Visual Studio your app just runs normally.  How do you simulate the OS launching app via a specific page.

The easiest way is to simply add a BackgroundTask to your app.  You don’t actually have to create a BackgroundTask but simply add an entry for a dummy task to your WMAppManifest.xml.  It does not matter that the BackgroundTask you are pointing to does not exist.

...
<Tasks>    
 <DefaultTask  Name ="_default" NavigationPage="MainPage.xaml"/>
  <ExtendedTask Name="BackgroundTask">
      <BackgroundServiceAgent Specifier="ScheduledTaskAgent" 
        Name="ScheduledTaskAgent1" Source="DummyAgent"
        Type="DummyAgent.ScheduledAgent" />
  </ExtendedTask>
</Tasks>
...

The debugging behavior of Visual Studio changes once you have a BackgroundTask configured.  Visual Studio will now remain attached even after you quit your app.

This means you are able to debug your secondary tile deep links by launching your app as usual using F5, then quit out back to the phone start screen and re-launch it using your pinned secondary tile.  This will launch your app again using the deep link URI you provided when you created your secondary tile, but crucially since the debugger is still attached you will be able to hit any break points and debug as if you’d launched directly from Visual Studio using F5.

Don’t forget to remove the BackgroundTask entry from WMAppManifest before you ship your app, otherwise you will fail marketplace validation.

Why is it slow to launch apps on Windows Phone 7 in debug mode?

Summary

Don’t enabled the the option to automatically download debugging symbols from the Microsoft Symbol Servers in Visual Studio when debugging Windows Phone 7 apps.

The Problem

For the past week or so I’ve suffering from a problem that it has been taking a very long time to launch Windows Phone 7 apps in debug mode from Visual Studio.  It was takes up to 10 seconds for apps to launch, but only when the debugger was attached.  Watching the output window I could see the all the Silverlight assemblies loading one by one, taking about a second each.

What was going on?  I hadn’t made any significant changes to my WP7 or the WP tools since I installed the Mango beta.  Why should it all of a sudden slow down like this?

Well, I found the answer when I happened to be debugging some HTTP traffic with Fiddler. I happened to launch a WP7 app while Fiddler was running and saw the following spewed forth into the stream:

image

Visual Studio was trying to download debugging symbols for Silverlight on the Phone, but failing because they are not available.

Although I never explicitly enabled this in Visual Studio, I had recently upgraded to ReSharper 6.  And one of the options in R# is to have it turn on the automatic downloading of symbols from the Microsoft Symbol Servers for you.  I had turned this option on without really thinking of it, when I was debugging a WPF app a little while ago.  Little did I realise it would have such an effect on my WP7 apps.

The Fix

Fortunately the fix is pretty easy just turn off the auto-downloading of symbols in Visual Studio.  This setting can be found in TOOLS –> OPTIONS –> DEBUGGER –> SYMBOLS.

image

Unchecking “Microsoft Symbol Servers” will prevent Visual Studio from trying to automatically download the symbols for WP7 each time the app launched.

Unfortunately this means you are also turning off this functionality for your other projects too.  However if all you need to do is run those projects once with this option enabled for the relevant symbols to be downloaded and cached locally.  Once they are on your local machine, you can simply disable it again.

Mango Background Image Load Gotcha

One not often mentioned change in Windows Phone 7.1 Mango is background image loading.  By default images are now loaded and decoded on a background thread, rather than blocking the UI thread.

This is great for performance, however it does mean a potentially breaking change in Mango.

Ok, well not a breaking change, in that it won’t stop your app from working, but breaking in the sense that you might see undesirable behaviour when upgrading to Mango.

The big culprit here is page backgrounds.  If you are using an ImageBrush of an image for your page\panorama\pivot you might find that when the page loads there is a slight flicker or delay before the background image is displayed.  So your pages loads and then half a second later the background image appears.

This is happening because the background image is now being loaded and decoded on a background thread, meaning your page is actually loading quicker (because you aren’t waiting for the background image to be loaded, as you were before) – but before the background image has finished.

Fortunately the fix is easy.  We just need to tell Silverlight to delay displaying of the page until the background has finished loading.

<controls:panorama>
  <controls:panorama.background>
    <imagebrush imagesource="UriSource="Images\MainPanorama.jpg"/">
  </controls:panorama.background>
</controls:panorama>

In Mango you can now specify CreateOptions to tell sliverlight to wait will the image has loaded:

<controls:panorama>
  <controls:panorama.background>
    <imagebrush>
      <imagebrush.imagesource>
        <bitmapimage createoptions="DelayCreation" 
           urisource="Images\MainPanorama.jpg">
      </imagebrush.imagesource>
    </imagebrush>
  </controls:panorama.background>
</controls:panorama>

Unfortunately specifying DelayCreation does mimic the exact behaviour of WP7.0.  From my testing it does seem to introduce a few split seconds of a blank screen between pages when navigating in Mango which didn’t happen in 7.0.

Getting started with Unit Testing using NUnit Test Runner for WP7

As those who know me will know, I am somewhat sceptical when it comes to applying enterprise patterns and practices, such as TDD\unit testing, BDD, DI/IOC etc. to mobile development (mobile apps face a different set of problems to enterprise apps, so why do we feel the need to apply the same solutions?).

Nevertheless unit testing does have it’s place even in mobile apps and TDD is great for solving certain problems.  So how do you go about getting started?

Fortunately there are a few projects out there that provide testing frameworks which will allow us to write and run tests on Windows Phone OS.  My project of choice is NUnitTestRunner.  Unlike other types of projects on WP7 you can’t use an off the shelf test runner like VS2010, ReSharper or TestDriven.NET, since you aren’t going to run your tests on your PC but on your device (or the emulator).  Instead you have to create your own test runner by creating your own app to run your tests.  Fortunately NUnitTestRunner simplifies all the work involved in creating this app but it does take a little setting up.  Heres how:

1.) Download and build the latest release of NUnitTestRunner.

2.) Add a new Windows Phone 7 app to your solution using the “Windows Phone 7 Application” template.  Note that we are creating an “Application” here, not a “Class Library” which is where you would normally start with a unit test project (using nUnit, xUnit, MSTest, etc).

3.) Add a reference to the NUnitTestRunnerWP7.dll that was the output of the project you build in step 1.

4.) Remove the NavigationPage attribute from the <Tasks> element in the WMAppManifest.xml.

image

5.) Delete the MainPage.xaml file from your project since it is no longer required.

6.) Remove the <Application.ApplicationLifeTimeObjects> elements from App.xaml.

7.) Replace all the code in App.xaml.cs with the following:

public partial class App : Application
{
    public App()
    {
        InitializeComponent();

        this.Startup += App_Startup;
    }

    void App_Startup(object sender, StartupEventArgs e)
    {
        var assembliesList = new[]
                             {
                                 //This assumes all tests are in this
                                 // assembly.  Add other assemblies
                                 // to the array if not.
                                 Assembly.GetExecutingAssembly()
                             };

        NUnitTestRunnerWP7.NUnitTestRunner.Setup(assembliesList);
    }
}

Now set Visual Studio to run this test app on startup – right click on the project in Solution Explorer and choose “Set as Startup Project”.  Now when you press F5 to debug it should launch the test runner.  You should see this:
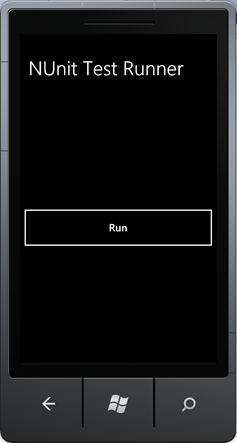
image

If you click the Run button you should see this:

image

We see 0 Passed and 0 Failed but we haven’t written any tests so that is to be expected.

8.) Finally start adding some test fixtures just as you usually do in NUnit.

   [TestFixture]
    public class ExternalSampleTests
    {
        [Test]
        public void ExternalSampleTest()
        {
            Assert.IsTrue(true);
        }
    }

Running your project with some test in it should yield something along the lines of:

Single Most Useful Resource For Learning Rx Extensions for .NET

As anyone trying to grok the Reactive Extensions for .NET knows it can be a bit of a monster to get your head around.

Much of the material out there that tried to explain it doesn’t do a good job, and that’s because its not something you can understand of after a 5 min overview or a few blog posts (even a series of blog posts).

Nevertheless this talk by Bart De Smet is hands down the best resource I have found for learning about Rx and IObservable.  I highly recommend anyone as a jumping off point for getting started with the Reactive Extensions.

“The application could not be launched for debugging” when using the WP7 emulator

I’ve just come across this error when trying to launch my WP7 app for debugging on the emulator.

image

“The application could not be launched for debugging. Ensure that the target device screen is unlocked and that the application is installed”

The thing is that everything was working fine last night, and this morning I started getting this error when I press F5 to launch the app.  Usually you see this error when debugging on hardware when the physical device’s screen is locked.  But this is on the emulator which doesn’t have a screen lock! So what gives?

Well the error message does say to check that the application is installed and sure enough when I checked the emulator the app was no where to be found.

But I was pressing F5 and launching the app from Visual Studio.  Isn’t that supposed to boot the emulator and deploy the app to it?

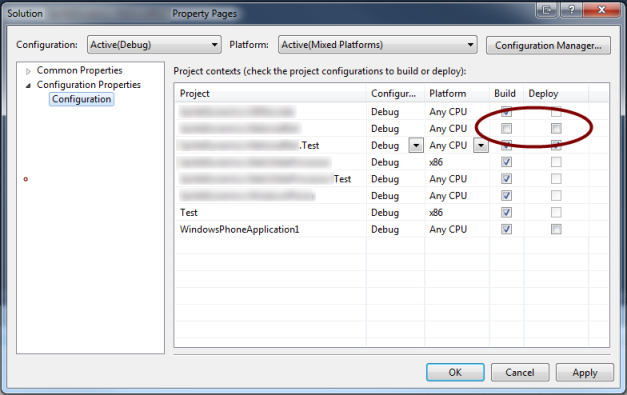
Actually yes it does…but only if it is configured to do so in the solution settings.  Checking the solution properties for shows the problem.

image

(Blurs = NDA)

My main application project wasn’t set to build or deploy to the phone for the “Debug” configuration (or “Release” for that matter).  So checking these two boxes so that it does build and deploy solves the problem.

That does leave the question, how did they become unchecked in the first place?  It was all working fine when I left it yesterday.

I’m not sure what causes it but this is not the first time I have seen the configuration spontaneously change like this.  All I can say is that it seems to have started after I added some non-Windows Phone projects to the solution.  In this case I have a console app for building some binary data files that the app uses.  image

I don’t think that the problem is the x86 projects themselves but rather the fact that I have an extra build configuration.  I have a “Console App” configuration, in addition to “Debug” and “Release” which I can use for just debugging the console app (When I’m debugging the console app I don’t want to deploy or build the WP7 projects).

And that seems to be the source of the problem.

Something is mixing up the settings from the “Console App” configuration and overwriting the “Debug” settings.  If I had to I would point the finger at Expression Blend.  Blend does not support build configurations and I have had many problems getting Blend to build and run the solution ever since I added the “Console App” configuration.

The smoking gun was that last night, for the first time in a while I was working in Blend and deploying apps from there directly (usually I always deploy from Visual Studio).

New Windows Phone 7 Marketplace icons

We are all familiar with the app store and marketplace icons for apps in the Apple app store.

iosappstore

Well now finally Windows Phone 7 has one too and it comes in 2 different styles and 3 different colours no less.

wp7_278x92_blue

wp7_480x80_blue

wp7_278x92_green

wp7_480x80_green

wp7_278x92_red

wp7_480x80_red

You can download the full set of icons including the license agreement for using them here.

Bear in mind that in order to use these icons you must agree to Microsoft’s license which essentially means:

  • You cannot alter them in anyway (including changing the colours, wording, size or dimensions).
  • They must be used in relation to an app that is published in the Marketplace.
  • The images must only link directly to the app in the Marketplace.  Eg:
    http://social.zune.net/redirect?type=phoneApp&id=c14e93aa-27d7-df11-a844-00237de2db9e
  • You must leave a border of at least 1/4 the height of the logo between it and any surrounding content.

How to implement Basic HTTP Authentication in WCF on Windows Phone 7

Unfortunately the version 1.0 of the Windows Phone 7 SDK is missing a few essentials.  One of which is that the Phone’s WCF implementation doesn’t support basic authentication for non-WCF services. So if you need to supply a user name and password to access a remote service, you’re on your own.  Setting the Security mode in your binding config as you normally would doesn’t work.

Fortunately basic HTTP authentication is easy enough to implement yourself.

As the name suggests Basic Authentication is basic.  It is simply an “Authorization” header which is added to the HTTP call which contains the base64 encoded user name and password.

Authorization: Basic dXNlcm5hbWU6cGFzc3dvcmQ=

The good news is that implementing basic authentication means simply adding this header to your going calls.  Here’s how.

Firstly we need a method to encode the credentials:

private string EncodeBasicAuthenticationCredentials(string username, string password)
{
  //first concatenate the user name and password, separated with :
  string credentials = username + ":" + password;

  //Http uses ascii character encoding, WP7 doesn’t include
  // support for ascii encoding but it is easy enough to convert
  // since the first 128 characters of unicode are equivalent to ascii.
  // Any characters over 128 can’t be expressed in ascii so are replaced
  // by ?
  var asciiCredentials = (from c in credentials
                     select c <= 0x7f ? (byte)c : (byte)'?').ToArray();

  //finally Base64 encode the result
  return Convert.ToBase64String(asciiCredentials);
}

Now that we have a means of encoding our credentials we just need to add them to the headers of our WCF request.  We can easily do this by wrapping the call in an OperationContextScope:

var credentials = EncodeBasicAuthenticationCredentials("username", "password");

using (OperationContextScope scope =
          new OperationContextScope(service.InnerChannel))
{
  HttpRequestMessageProperty request = new HttpRequestMessageProperty();
  request.Headers[System.Net.HttpRequestHeader.Authorization] = "Basic " + credentials;

  OperationContext.Current.OutgoingMessageProperties.Add(
                                     HttpRequestMessageProperty.Name, request);

  service.DoSomethingAsync();
}

This easily adds basic HTTP authentication for your WCF call on the fly.  Unfortunately using the OperationContext like this means you have to remember to add the header each time you make a call. If you are going to regularly be needing to do this you might want to consider creating a custom Channel, which automatically adds the header to all outgoing requests.  The technique would essentially be the same, it’s just that it would code it once for the channel rather than for each individual call. [Update 08/12/2010: There is no centralised way to do this in Silverlight 3.0]

Also it is always worth mentioning that basic authentication is not secure.  Encoding the username and password does not encrypt them.  They are transmitted over the internet in the clear for anyone to read.

WP7 URI’s need to be encoded just like on the web

I found a little gotcha with the way WP7 handles the encoding of uri’s which could trip you up when passing string values through to pages via query strings.

I was trying to pass this ID through to a second page via a parameter on the uri.

var id = “HxmyKn0F+Y8XbksplmTzFQ==”;
NavigationContext.Navigate(new Uri(“MyPage.xaml?id=” + id, UriKind.Relative));

Only thing is, when I pulled the value out of the QueryStrings collection the ID had changed to:

“HxmyKn0F Y8XbksplmTzFQ==”

Silverlight had changed the “+” sign into a space.  But why?

Although it is a little counter intuitive in this context, this actually is the expected behaviour.  The spec for URL encoding (RFC 1738 if you feel the urge to read up) attaches special significance to the “+” sign as part of the URL (along with other special characters – see below).  We can’t include these characters in our data so we need to escape it as described in the spec.

Obviously this is nothing new.  It is one of the first things you learn when you start developing for the web.  In fact we can use the same HttpUtility.UrlEncode() utility that we would on the web. 

var encodedUri = “/MySecondPage.xaml?myID=” + HttpUtility.UrlEncode(“HxmyKn0F+Y8XbksplmTzFQ==”); 

Lesson: Unless you can absolutely guarantee that your string parameters won’t contain reserved URL characters, they must be encoded using UrlEncode() first.  This is actually quite important and is often left out of most tutorials about navigation on Windows Phone7.

For the record here is a list of the all of the reserved characters:

$ ? }
& @ |
+ SPACE \
, < ^
/ > ~
: # [
; % ]
= { `